MR2 SpyderChat banner

3M Headlight Protection

3.3K views 20 replies 10 participants last post by  sonicfury  
#1 ·
#2 ·
Not familiar with that particular film, but I have a few friends that have used the films from Lamin-X and they have said good things about it. I'm thinking of getting some to help attempt to protect my fogs as soon as I finally replace my cracked ones...

Here's a link to the MR2 kit: Lamin-X MR2 Spyder
 
#6 ·
<div class='quotetop'>QUOTE (broudie @ Jul 15 2007, 12:28 AM) <{POST_SNAPBACK}></div>
I think theres an install article on this at spydermagazine.com[/b]
FWIW, I put a 3M headlight protection kit sold by X-Pel on my headlights after some punk-ass college kid spray painted on them, and it has worked great. This past December, when I hit a guardrail on the front pass. side of my car, there were gouges put in the film and the light hit so hard a piece of plastic broke off from the housing on the inside, but the lens itself was still completely intact - no cracks or anything. Due to financial issues, I'm actually still using the damaged headlight. The film was a bitch to put on, but it's manageable if you have patience and a healthy repertoire of 4-letter words. I can post or send you pics of what it looks like on my HL's if you want, but I should add the disclaimer that I messed up slightly on the passenger side install - a moot point now since I need a new HL anyway. The driver's side looks good though, and there's not been even a hint of peeling.
 
#7 ·
<div class='quotetop'>QUOTE (sonicfury @ Jul 15 2007, 04:55 AM) <{POST_SNAPBACK}></div>
<div class='quotetop'>QUOTE (broudie @ Jul 15 2007, 12:28 AM) <{POST_SNAPBACK}>
I think theres an install article on this at spydermagazine.com[/b]
FWIW, I put a 3M headlight protection kit sold by X-Pel on my headlights after some punk-ass college kid spray painted on them, and it has worked great. This past December, when I hit a guardrail on the front pass. side of my car, there were gouges put in the film and the light hit so hard a piece of plastic broke off from the housing on the inside, but the lens itself was still completely intact - no cracks or anything. Due to financial issues, I'm actually still using the damaged headlight. The film was a bitch to put on, but it's manageable if you have patience and a healthy repertoire of 4-letter words. I can post or send you pics of what it looks like on my HL's if you want, but I should add the disclaimer that I messed up slightly on the passenger side install - a moot point now since I need a new HL anyway. The driver's side looks good though, and there's not been even a hint of peeling.
[/b][/quote]
Please post the install!
 
#8 ·
Nice to know we can do something to effectively protect the headlight lenses from sand and small stones constantly being thrown up by vehicles in front of us, even if were're back the recommended one-car-length per 10-MPH. And especially if it doesn't degrade the quality and effectiveness of night time illumination.
 
#10 ·
<div class='quotetop'>QUOTE (nsxtyperlb @ Jul 15 2007, 12:51 PM) <{POST_SNAPBACK}></div>
I wonder if it also helps the lens to fight clouding up yellowish from all the UV ray too[/b]
Standing ready to be corrected, but I believe that's on the inside. This stuff's on the outside.
From what I've read on another forum, you can easily clear that up by removing the headlight assemblies, removing all of the bulbs, taking some water that dishwasher detergent has been desolved in and filling the headlight about 1/3rd of the way with that solution, and then sloshing it around.
Drain it out, rinse the headlight several times with clear water, give it some time to drain and then invert the headlight with the opening for the bulbs pointed up so that the moisture inside can pass upward. May take a day or two to completely dry. I've not done it, but that's what I've read from guys who've (supposedly) done it.
 
#11 ·
Guys, this is a big if, i work for 3m here in the UK. If there was abig enough demand for this product, i could see about a discount, no promises though.
 
#12 ·
Curt, I don't see why you can't use it. But this is just to protect the lenses, I doubt it will prevent the lenses from yellowing until you get the specification from the manufacturer.

It's not expensive, so just give it a try. To use with the eyebrows, just installed the eyebrows first, that measure off the size you require off the 3M tape, then stick them on. You don't want to install the eyebrows on top of the film. That's not the right way to go about it.
 
#13 ·
<div class='quotetop'>QUOTE (Curt @ Jul 15 2007, 02:57 PM) <{POST_SNAPBACK}></div>
<div class='quotetop'>QUOTE (nsxtyperlb @ Jul 15 2007, 12:51 PM) <{POST_SNAPBACK}>
I wonder if it also helps the lens to fight clouding up yellowish from all the UV ray too[/b]
Standing ready to be corrected, but I believe that's on the inside. This stuff's on the outside.
From what I've read on another forum, you can easily clear that up by removing the headlight assemblies, removing all of the bulbs, taking some water that dishwasher detergent has been desolved in and filling the headlight about 1/3rd of the way with that solution, and then sloshing it around.
Drain it out, rinse the headlight several times with clear water, give it some time to drain and then invert the headlight with the opening for the bulbs pointed up so that the moisture inside can pass upward. May take a day or two to completely dry. I've not done it, but that's what I've read from guys who've (supposedly) done it.
[/b][/quote]
I infact had opened 6 sets of spyder head light so far so I do know some thing about cleaning it and stuff. I know most of the problem is inside but my current set up has some nasty stuff on the outside. The lens are not yellow but they are cloudy enough if the sun shine directly on the lens. I'll attempt to wet sand everything this week
 
#15 ·
As a last resort for fixing deterioration on the outside of the lens, I would wet sand with 2000 grit wet-or-dry, and then follow up with a plastic polish. Meguiar's makes a "PlastiX" product for this very purpose, as well as a "DeepCrystal System Polish."
 
#17 ·
<div class='quotetop'>QUOTE (SimonTan75 @ Jul 15 2007, 11:52 PM) <{POST_SNAPBACK}></div>
Curt, I don't see why you can't use it. But this is just to protect the lenses, I doubt it will prevent the lenses from yellowing until you get the specification from the manufacturer.

It's not expensive, so just give it a try. To use with the eyebrows, just installed the eyebrows first, that measure off the size you require off the 3M tape, then stick them on. You don't want to install the eyebrows on top of the film. That's not the right way to go about it.[/b]
When I dealt with the spray paint issue a while back, I read up on the material out of which our HL's are made to see what was safe to use on them to take the paint off. The guys at my bodyshop ended up taking it off with some special paint removing solvent to which I don't have access. True2form is the shop I use, btw, and I highly recommend them if you're looking to get your Spyder in as close to new condition as possible. They've helped me in ways I'm not even sure are legal
Image
. Anyway, our lenses are polycarbonate with a UV-absorbing coating on the outside to prevent oxidation caused by sunlight. The only plastic I remember reading about that doesn't yellow from sun exposure is acrylic, and I believe they used acrylic on WWII aircraft windscreens and windows for that reason. Here's a site that should help you restore your HL's and answer some questions - The Headlight Solution.

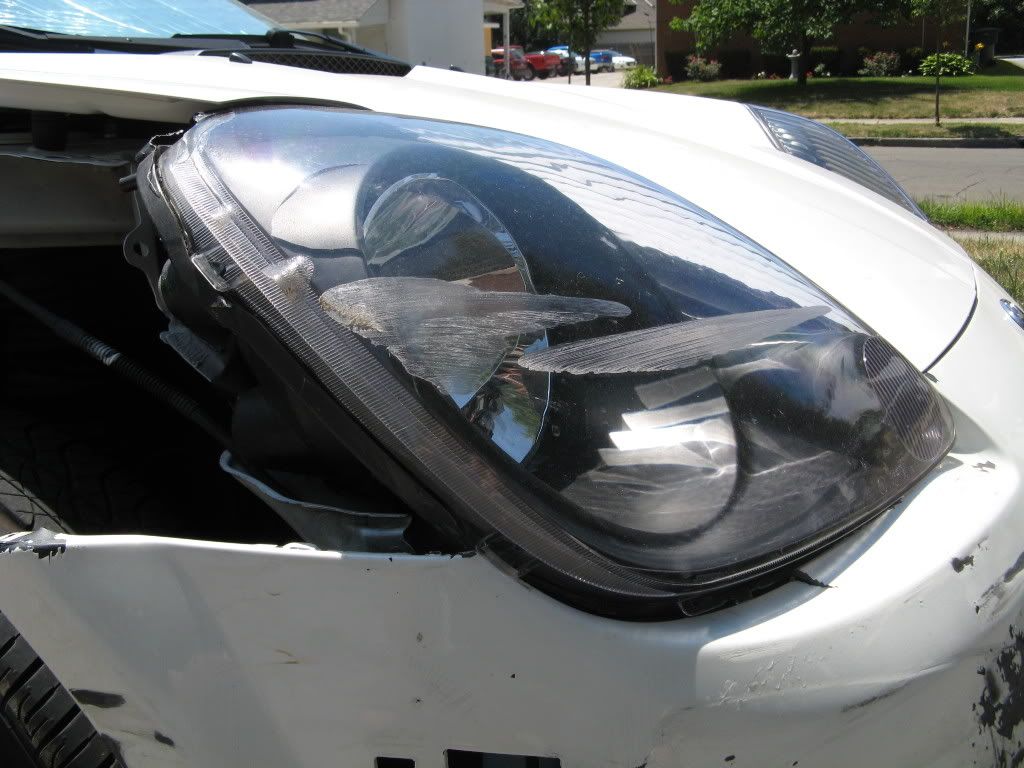
The X-Pel HL cover kit protects the HL's from sunlight damage as well, but only on the parts it covers (duh). The inboard area of the HL that has that axially-oriented prismatic area molded into it isn't covered. The film is about 2mm thick. Here are pictures of my install.
Image

Full frontal shot

Image

Image

From above

Image

Left side from behind showing the side and the seam

Image

Left side showing the seam and the uncovered area

Image

Left side close-up showing the seam and the slight accumulation of dirt along the edge

Image

Right side showing bubbling in the film on the outboard edge of the light + scuffs from the guardrail

Image

Right side showing the broken housing, intact lens, and bubbling from initial film installation

Hopefully, USAA will get the paperwork taken care of so I can get the last of my bumper damage repaired and my friggin' fender put back on soon...
 
#18 ·
3M makes a 3000 grit wet sanding pad for a DA. We use this on headlights and taillights at the body shop i work at. We then buff it with a white 3m pad with a farcla compound not sure which one i'll acutally pay attention tomorrow then finish it up with a 3M black pad and 3m trizact machine glaze finishing compound. The wet sanding will take out small scrapes but just buffing will take out the dinginess and discoloration.
 
#19 ·
<div class='quotetop'>QUOTE (nocoolname @ Jul 16 2007, 09:44 PM) <{POST_SNAPBACK}></div>
3M makes a 3000 grit wet sanding pad for a DA. We use this on headlights and taillights at the body shop i work at. We then buff it with a white 3m pad with a farcla compound not sure which one i'll acutally pay attention tomorrow then finish it up with a 3M black pad and 3m trizact machine glaze finishing compound. The wet sanding will take out small scrapes but just buffing will take out the dinginess and discoloration.[/b]
This is really great information and should be helpful to a lot of guys. I'm sure that the local Lowe's or Home Depot won't have these materials. Maybe eBay. Any suggestions where to get? And or those of us not in the business, some clarification please for:
"DA"
"farcia compound"
"3M Black Pad"
"3m trizact machine glaze finishing compound"
IMNSHO, this information is worthy of being in the Library or some other FAQ or How-To place.
 
#20 ·
DA= Dual action sander otherwise known as a dual orbit.
3M black pad = its a coumpounding pad for buffing cars. It's made of black foam and is eggshell like
3M trizact = type of machine glaze used with above pad for a nice shiny finish.
I misspelled farcia its actually farecla and it's the G3 compound. its used with a white 3M pad like the black one only a little coarser and white. An autoparts store should have these materials expecially if they carry 3M products. If you guys want i'll take some pics with my camera phone when i buff my car when i get it back and do a how to for cars and headlights. I strongly recommend not buffing your car if you haven't buffed anything before(floors don't count.) Also if you guys have some questions about body work and paint work shoot them my way if you guys start a thread i'll try to asnwer my questions. I work full time at a reputable body shop; thats where my experience comes from.
 
#21 ·
<div class='quotetop'>QUOTE (nocoolname @ Jul 18 2007, 10:21 PM) <{POST_SNAPBACK}></div>
DA= Dual action sander otherwise known as a dual orbit.
3M black pad = its a coumpounding pad for buffing cars. It's made of black foam and is eggshell like
3M trizact = type of machine glaze used with above pad for a nice shiny finish.
I misspelled farcia its actually farecla and it's the G3 compound. its used with a white 3M pad like the black one only a little coarser and white. An autoparts store should have these materials expecially if they carry 3M products. If you guys want i'll take some pics with my camera phone when i buff my car when i get it back and do a how to for cars and headlights. I strongly recommend not buffing your car if you haven't buffed anything before(floors don't count.) Also if you guys have some questions about body work and paint work shoot them my way if you guys start a thread i'll try to asnwer my questions. I work full time at a reputable body shop; thats where my experience comes from.[/b]
Welcome to Spyder Chat and thanks for bringing more useful knowledge with you to add to our pool! (That is knowledge, right? Wait, it's lookin' kinda yellow... Must be the light
Image
)