*update* this project is actually moving forward and I’m posting a summary up here for the people that just want a quick look, the original first post is below.
This project has ended up being a bit bigger than originally envisioned, the transmission has to be swapped at the same time, for details you can dig through the rest of this thread or you can feel free to just ask a question here or via e-mail (Marc@FrankensteinMotorworks.com) Parts will be available on FrankensteinMotorworks.com as they become available.
Also, as with my other parts I sell, there’s no need to buy parts to get some questions answered. If you plan on making some or most of the parts yourself you can still feel free to ask me questions, as long as you aren’t asking for dimensional information to make the parts yourself I’ll do my best to answer the questions.
And finally, before I get into the details please note that the 6 speed transmission mounting stuff will be available separately but is not intended to be used with the stock engine. They will bolt together but the transmission is not located at the same spot as stock. The transmission stuff is available separately to enable other swaps in the future like the 8AR-FE and others.
So, without further delay, here’s the list of all the parts I’m making for this swap and their current status. I’ll do my best to keep this up to date over time but it’s possible that this is a few days behind. The prices on parts that are already for sale will not be changing, the prices on parts that are done is very unlikely to change but something may happen during production to trigger a change. The prices marked projected are just best guess estimates and may change up or down.
2AR-FE Engine bits:
-Right side motor mount $140 (done, for sale) see listing here: https://frankensteinmotorworks.squarespace.com/mr2-spyder-shop/2ar-fe-right-side-motor-mount
-Thermostat conversion housing $148 (Done, for sale) See listing here: http://frankensteinmotorworks.squarespace.com/mr2-spyder-shop/2ar-fe-conversion-thermostat-housing
-Tuned ECU: $370 + $50 core (haven’t started but I have enough experience with the 2GR to know the price is good) At first an ECU will be available that will require an immobilizer but I expect to remove the immobilizer at some point in the near future. Instructions to program the immobilizer ECU to the engine ECU will be provided. I expect this ECU to have no fault codes when running in this swapped application, the VVT-I will also be tweaked to be more appropriate for a RWD application and the redline will be raised a bit. Exact RPM will depend on testing but it’ll likely be about 7000RPM.
-Idler bracket for No A/C installation $87 (done, for sale) See Listing here: https://frankensteinmotorworks.squarespace.com/mr2-spyder-shop/2ar-fe-ac-delete-idler
6 speed transmission swap bits:
-Transmission mounts $385 (Done, for sale) see listing here: https://frankensteinmotorworks.squarespace.com/mr2-spyder-shop/eb6x-transmission-mount-kit
-Axle shafts $220 (done) the $220 won’t actually be spent in my store I’m just going to be providing instructions on how to assemble your own axles. The preliminary excerpt from the document that explains how to is here: http://frankensteinmotorworks.com/M.../documentation/Toyota 2AR Instalation guide for MKIII Spyder (axle excerpt).pdf
-Shift Linkage kit $430 (Done, for sale) see listing here: http://frankensteinmotorworks.squarespace.com/mr2-spyder-shop/eb6x-transmission-shift-linkage-kit
Exhaust:
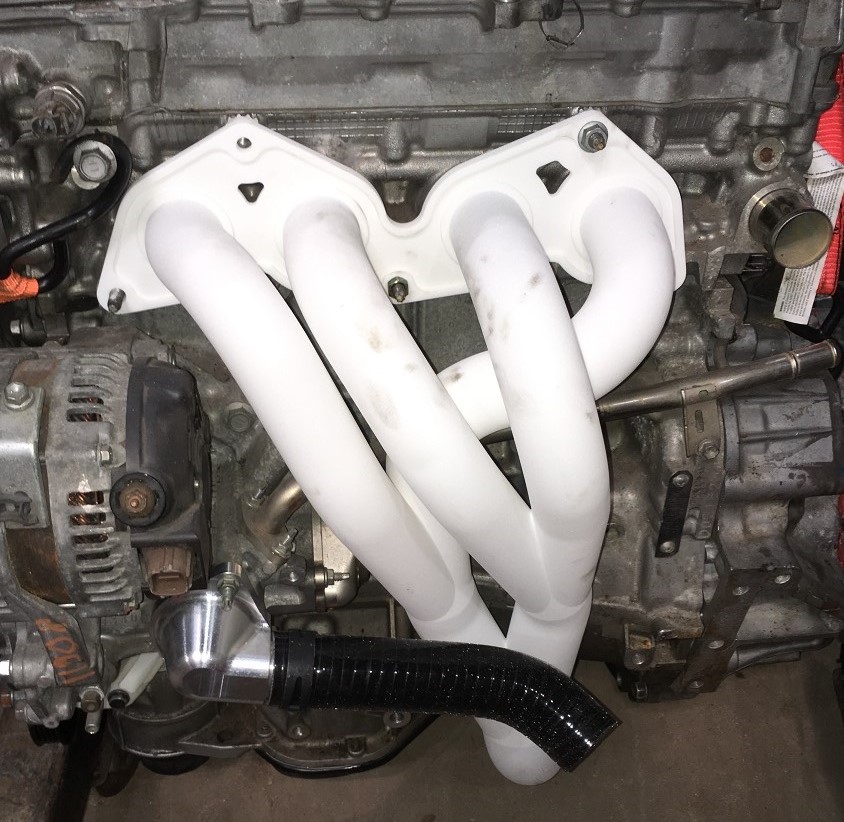
-Header $425 (projected price, design done organizing production run), this is a 4-2-1 header using an equal length design that fits well within the constraints of the motor. You can see the plastic prototype here:
![Image]()
-Intermediate pipe $300 (very preliminary pricing, part is not designed yet) I expect this part to connect the above header to the stock tail section and have at least one straight section where a catalytic converter could be added relatively easily if needed for your locale.
Air conditioning:
A/C bracket $120 (very preliminary projected pricing) note that this replaces the $84 idler above so do not add both prices when projecting a cost. This bracket will mount the Nissan juke reduced diameter A/C compressor to the 2AR in a way that leaves clearance for the MKIII MR2 chassis. This part is not designed out yet.
Drive by wire:
Firewall adapter: $58 (done, for sale) see listing here: http://frankensteinmotorworks.squarespace.com/mr2-spyder-shop/dbw-pedal-adapter Note that this assumes there is carpet in the vehicle and a stop will have to be added to prevent over-travel in cars without carpet. Dimensions for the stop will be documented.
Extras:
Installation manual $Free. Unlike my 2GR-FE MKII parts, there will be a properly documented installation manual for this swap. I will be doing this swap in another chassis designed for street use, not race car use to finish out this manual and properly document everything.
Wiring pigtails: This is another shortcoming learned from the 2GR stuff. Pigtails are available for cheap at the u-pull-it yard but many people are unable or unwilling to go get those parts. I will do my best to make an ECU body side pigtail available as well as a DBW pedal pigtail.
My goal has been to make all the parts available for under $2500 and right now a swap without A/C is projected at $2093 and $2129 if you want A/C. keep in mind this does not include the $220 you’ll also need to spend on axles.
* end of update *
Hi guys, I don't show my face here very often so for those that don't know me, i'm the guy that makes and sells 2GR-FE swap kits for MKII MR2s and I'm starting to look ahead a few projects. I'm thinking i want to start supporting the MKIII MR2 market.
In my opinion the 2GR is a bit big for the MKIII, but now that i have the Toyota ECUs hacked it really opens up possibilities. Particularly the 2AR-FE is pretty interesting. it would fit nicely in the engine bay, not change the stock weight add about 40% more power over stock and also open up the options for beefy turbo builds.
So, is there interest?
On a side note, i'm looking for a mule to start developing on in about 3-6 months. I'm in Indianapolis so if anyone has or knows of a reasonably clean MKIII for cheap. I don't care if the motor is blown but i do want to buy a complete car that hasn't had any modifications.
Feel free to post the reply here or contact me directly: Marc@frankensteinmotorworks.com
Thanks!
This project has ended up being a bit bigger than originally envisioned, the transmission has to be swapped at the same time, for details you can dig through the rest of this thread or you can feel free to just ask a question here or via e-mail (Marc@FrankensteinMotorworks.com) Parts will be available on FrankensteinMotorworks.com as they become available.
Also, as with my other parts I sell, there’s no need to buy parts to get some questions answered. If you plan on making some or most of the parts yourself you can still feel free to ask me questions, as long as you aren’t asking for dimensional information to make the parts yourself I’ll do my best to answer the questions.
And finally, before I get into the details please note that the 6 speed transmission mounting stuff will be available separately but is not intended to be used with the stock engine. They will bolt together but the transmission is not located at the same spot as stock. The transmission stuff is available separately to enable other swaps in the future like the 8AR-FE and others.
So, without further delay, here’s the list of all the parts I’m making for this swap and their current status. I’ll do my best to keep this up to date over time but it’s possible that this is a few days behind. The prices on parts that are already for sale will not be changing, the prices on parts that are done is very unlikely to change but something may happen during production to trigger a change. The prices marked projected are just best guess estimates and may change up or down.
2AR-FE Engine bits:
-Right side motor mount $140 (done, for sale) see listing here: https://frankensteinmotorworks.squarespace.com/mr2-spyder-shop/2ar-fe-right-side-motor-mount
-Thermostat conversion housing $148 (Done, for sale) See listing here: http://frankensteinmotorworks.squarespace.com/mr2-spyder-shop/2ar-fe-conversion-thermostat-housing
-Tuned ECU: $370 + $50 core (haven’t started but I have enough experience with the 2GR to know the price is good) At first an ECU will be available that will require an immobilizer but I expect to remove the immobilizer at some point in the near future. Instructions to program the immobilizer ECU to the engine ECU will be provided. I expect this ECU to have no fault codes when running in this swapped application, the VVT-I will also be tweaked to be more appropriate for a RWD application and the redline will be raised a bit. Exact RPM will depend on testing but it’ll likely be about 7000RPM.
-Idler bracket for No A/C installation $87 (done, for sale) See Listing here: https://frankensteinmotorworks.squarespace.com/mr2-spyder-shop/2ar-fe-ac-delete-idler
6 speed transmission swap bits:
-Transmission mounts $385 (Done, for sale) see listing here: https://frankensteinmotorworks.squarespace.com/mr2-spyder-shop/eb6x-transmission-mount-kit
-Axle shafts $220 (done) the $220 won’t actually be spent in my store I’m just going to be providing instructions on how to assemble your own axles. The preliminary excerpt from the document that explains how to is here: http://frankensteinmotorworks.com/M.../documentation/Toyota 2AR Instalation guide for MKIII Spyder (axle excerpt).pdf
-Shift Linkage kit $430 (Done, for sale) see listing here: http://frankensteinmotorworks.squarespace.com/mr2-spyder-shop/eb6x-transmission-shift-linkage-kit
Exhaust:
-Header $425 (projected price, design done organizing production run), this is a 4-2-1 header using an equal length design that fits well within the constraints of the motor. You can see the plastic prototype here:
-Intermediate pipe $300 (very preliminary pricing, part is not designed yet) I expect this part to connect the above header to the stock tail section and have at least one straight section where a catalytic converter could be added relatively easily if needed for your locale.
Air conditioning:
A/C bracket $120 (very preliminary projected pricing) note that this replaces the $84 idler above so do not add both prices when projecting a cost. This bracket will mount the Nissan juke reduced diameter A/C compressor to the 2AR in a way that leaves clearance for the MKIII MR2 chassis. This part is not designed out yet.
Drive by wire:
Firewall adapter: $58 (done, for sale) see listing here: http://frankensteinmotorworks.squarespace.com/mr2-spyder-shop/dbw-pedal-adapter Note that this assumes there is carpet in the vehicle and a stop will have to be added to prevent over-travel in cars without carpet. Dimensions for the stop will be documented.
Extras:
Installation manual $Free. Unlike my 2GR-FE MKII parts, there will be a properly documented installation manual for this swap. I will be doing this swap in another chassis designed for street use, not race car use to finish out this manual and properly document everything.
Wiring pigtails: This is another shortcoming learned from the 2GR stuff. Pigtails are available for cheap at the u-pull-it yard but many people are unable or unwilling to go get those parts. I will do my best to make an ECU body side pigtail available as well as a DBW pedal pigtail.
My goal has been to make all the parts available for under $2500 and right now a swap without A/C is projected at $2093 and $2129 if you want A/C. keep in mind this does not include the $220 you’ll also need to spend on axles.
* end of update *
Hi guys, I don't show my face here very often so for those that don't know me, i'm the guy that makes and sells 2GR-FE swap kits for MKII MR2s and I'm starting to look ahead a few projects. I'm thinking i want to start supporting the MKIII MR2 market.
In my opinion the 2GR is a bit big for the MKIII, but now that i have the Toyota ECUs hacked it really opens up possibilities. Particularly the 2AR-FE is pretty interesting. it would fit nicely in the engine bay, not change the stock weight add about 40% more power over stock and also open up the options for beefy turbo builds.
So, is there interest?
On a side note, i'm looking for a mule to start developing on in about 3-6 months. I'm in Indianapolis so if anyone has or knows of a reasonably clean MKIII for cheap. I don't care if the motor is blown but i do want to buy a complete car that hasn't had any modifications.
Feel free to post the reply here or contact me directly: Marc@frankensteinmotorworks.com
Thanks!